In this post, I will guide you through the Go-NoGo plug gauge production process. of the Go-NoGo plug thread gauge. I will use my own experience in CNC machining to explain things and also we will reference Titans of CNC videos because of their knowledge and experience.
Original video of Titans Of CNC;
[email_subscription]
Titans of CNC published a detailed video about how to make a plug gauge (acme-go-nogo). I wanted to make a detailed guide as I found this very useful and exciting for beginners and even pros.
Plug gauges were one of the challenging topics I faced in my career. They are the single source of truth that you can verify your thread’s shape and tolerance.
Because they are gauges, they must be machined with high tolerance and hardened with heat treatment to protect against frictional wear.
In Titans of CNC`s video, they machined It from a standard piece of steel with a Studer S31 grinding machine. As you can guess, grinding machines have insane precision which is quite enough to machine a go-nogo plug gauge. From my experience, 4040 steel can be good enough to machine easily and even you can harden it with heat treatment after machining.
Understanding the Purpose of Go-NoGo plug gauge.
When I was introduced to Go-No-Go gauges I wasn’t sure of their purpose. At first, I even considered using a standard bolt screw instead of a thread gauge. It would save time and money. However, when I started to work with bigger clients I realized the real purpose of thread gauges.
All thread gauges a single source of truth. Think like this; you got an order from your client and you have to machine a 1″-11 threaded hole with a threading tip. How can you be sure the machined thread is in tolerances and correct?
Without go-nogo gauges, your best try could be putting a bolt into this machined hole so you can see if it is too loose or moving properly through the hole by turning it.
However, the bolt you used can be not in correct tolerances and you cannot trust it verifies your machined threads. And how about if you make thousands of parts? Are able to verify all of them? Mind-blowing hah? Precision machining of threads is essential for ensuring accurate and reliable connections.
Yes, you guessed correctly, the Go and No-Go gauges are designed to solve this problem.
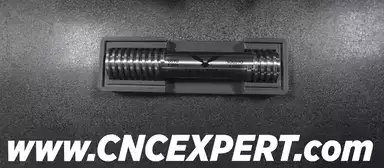
These thread gauges consist of two ends on a steel cylinder. When the Go side is inserted into the threaded hole it should run easily, which means your machining tolerances are acceptable.
In contrast, the NoGo side should not go into the threaded hole. In this way, you can check thread-sensitive diameters easily, and this tolerance verifying way scaleable to thousands of parts.
In the video between 7:42-7:55, Chris shows this process clearly. The nut goes in on the Go side and the nut binds on the NoGo side.
Who verifies the correctness of the Go-NoGo plug gauge?
Threads are one of the perfectly standardized bits in mechanical componentry. What does this mean for us? It means you can machine a part in the U.S. and it will work (fit) every machine around the world as expected if machined according to standards. Following thread standards and certifications ensures compatibility and reliability across industries.
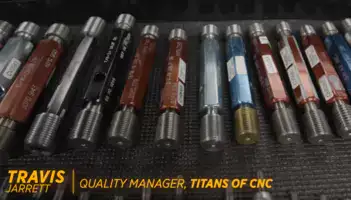
In the Titans Of CNC`s video, you can see Quality Manager Travis showed a wide range of Go-NoGo gauges which they used for SpaceX, Blue Origin, and Medical, and automotive industries.
They are all certified by third-party manufacturers. You can always receive a certificate during purchase to prove the customer’s correctness of your gauge.
You can buy them and use them straightaway in your production. The best thing is because it is certified so you can trust it as a source of truth and verify your part`s threats.
In my experience, I found myself receiving certified gauges from my clients. Because my clients want to make it guarantee that the parts are within their tolerances so they provide the gauges for us to check threats. So this takes responsibility for using the wrong gauge and eliminates unexpected time and money costs.
Titans Of CNC guys machined their special one(which is not recommended if you do not have high-quality machine and inspection tools like Titans of CNC ones.)
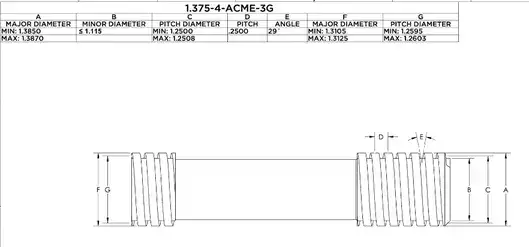
So they deep-dived into Acme Standards to find industry standard dimensions and tolerances. The thread was 1.375-4-ACME-3G and they find standard specs for it on ASME B1.5 ACME Screw Threads.
Why you should and shouldn’t machine your own Go-NoGo plug gauges?
As machinists, we believe we can machine every part. At least for myself I just want to machine any part as I can. This is the way I enjoy my profession. I am sure you feel like me too. But there are some situations you should and you shouldn`t. In some cases, creating custom thread gauges might be necessary depending on your client’s requirements.
However, I often found sometimes buying ready things is easier and safer for risky jobs. So my point is I wouldn’t machine a Go-NoGo plug gauge if I have a risky client like aerospace, medical or automotive clients. My mistakes could lead to the life of people or loss of investment.
Could you imagine a SpaceX rocket exploding during launch because of a wrongly machined thread? So being realistic and managing the risks are other qualities of CNC machinists. Buying a certified (from a trusted third-party) Go-NoGo Plug gauge is a better solution for inspecting high-risk class client components.
On the other hand, you could machine a Go-NoGo Plug gauge for your low-risk clients. As you can guess these Gauges are very expensive, and high-risk jobs can compensate for this cost spike however your local customer with a couple of part orders wouldn`t be happy to pay for this gauge. In this situation, you should machine a Go-NoGo Plug gauge for yourself so you can check the parts easily.
Ask your customer to take their advice, and decide whether to machine it or not. Your clients may provide you with one as I mentioned before.
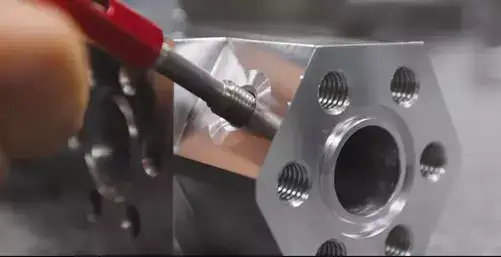
When you machine a Go-NoGo plug gauge you need to inspect it in high precision.
Proper thread inspection is crucial for maintaining quality standards. Everyone knows that Titans Of CNC has the best equipment in the industry. This applies to their inspection division too. After machining this gauge, Quality Manager Travis inspected it.
He used a micrometer and a needle micrometer to measure OD and pitch diameter. He mentioned 3 wire methods to measure and calculate the pitch diameter.
Also, Profile Projector PH-3500 allowed him to measure the profile with the magnified screen.
Looking from a machining strategy perspective.
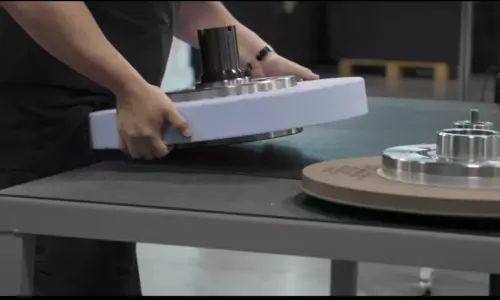
This video showcases advanced grinding machine techniques used in recent years. All material removal is done by grinding wheels. Chris Villalpando clearly explained his machining strategy. Any turning operation doesn’t involve this gauge machining. All shaping and material removal is done with grinding wheels.
Very large diameter grinding wheels allow machinists to remove a lot of material with minimum wheel wear. Wheel dressing must be done a couple of times to achieve high precision. If you don’t know the wheel dressing process, it is basically a process to re-shape the abrasive wheel to achieve perfect flat surfaces and shapes.
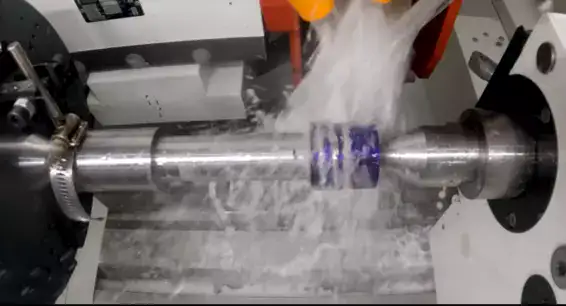
There is a nice technique I discovered here, Chris used a hose clamp to quarantine the moment transformation to the gauge workpiece. He did this because he couldn`t squeeze the workpiece with Chuck. He was compressing the part between pushers on the center holes.
Also, a good visualization method is relieved with video. Chris painted the OD so he could see how the wheel touched the workpiece. This is also good for seeing the progress of the machining program.
I have also included a step-by-step machining guide below. However this is can be just with just grinding machines as they did on video.
How to machine a Go-NoGo Plug with a Grinding machine.
Materials and tools list:
- 1x TYROLIT H Wheel – For Roughing
- 1x TYROLIT I Wheel – For Finishing-Threading
- 1x 35 Diameter 4040 Steel
- Measurement tools like Micrometer, caliper, Profile Projector
Step-1: Load and Calibrate your Tierlet H Wheel Abrasive wheels.
Step-2: Take Three jaws chuck off and put dead centers.
Step-3: Put center holes in two ends of gauge material so you can compress between dead centers.
Step-4: Give rough passes to remove material in the middle of the part.
Step-5: Use Dressing cycles to re-shape wheels.
Step-6: Bring the Right side of the gauge diameter to clearance.
Step-7: Flip the part
Step-8: Bring the other side of the gauge diameter to clearance.
Step-9: Use Dressing cycles to re-shape wheels.
Step-10: Give a finish pass to the right side of the gauge. Check the final diameter.
Step-11: Flip the part
Step-12: Give a finish pass to the other side of the gauge. Check the final diameter.
Step-13: Change the Wheels to Tierlet I wheel for finishing and threading.
Step-14: Machine the thread to the right side of the gauge. Check the diameters.
Step-15: Flip the part
Step-16: Machine the thread to the other side of the gauge. Check the diameters.
Step-17: Get the part to the inspector to verify tolerances.
The last touch makes it perfect.
Titans Of CNC uses 3d printing effectively for manufacturing peripherals. At the end of the video, after marking the GO-NoGo gauge with specs they made a storage box with a Markforged 3d printer. I have used the same printer in our workshop, it uses A.I. algorithms to print perfect parts. In the end, I really like how this job ended.
[email_subscription]
Summary
In the end, it was a nice video which was holding so many hints and secrets about precision gauge machining. Check their website, especially the CNC Expert platform which is mint for the CNC machining community.