Introduction
Threading the holes is not a very manual job, but when making machines and steel parts, it is sometimes necessary to use a guide and tap wrench to do threading jobs. We can put threads to drilled holes faster and cheaply with the taps.
[email_subscription]
When high precision isn’t needed, there is no need for a tapping machine or a CNC. If the part is heavy enough not to move, you don’t need to utilize the bench otherwise you can use a wise to fix the part. Fixing the part is very important wise part will move during tapping and it tap will get broken easily.
The point of this method and these tools are used to open a few small screws. It’s important to know how to tap and choose the right tap for the hole. For tapping holes of more than 10-20 you should consider automatizing it by using tapping machines and CNC machines.
Also, check this article which we explained all kinds of taps with usage scenarios.
What Is Tapping?
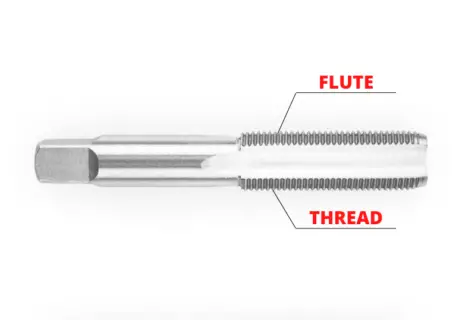
Taps are the tools used to make threads in the holes made by a drill. The screw thread is made when the Tap`s cutting edges plunge into the workpiece and then remove the chip from the workpiece.
So that the chips can fall out and the cutting fluid can reach the cutting edges. The cutting edges of the tap’s thread profile are developing as you twist the wrench (handle) on the hole’s side surfaces.
Taps with three flutes are used to thread soft materials, while taps with four flutes are used to thread steel and alloys. High-speed steel is used to make the tap bodies.
To see the common tap and pitch size tables on our website; Metric Taps, BSPT, NPT.
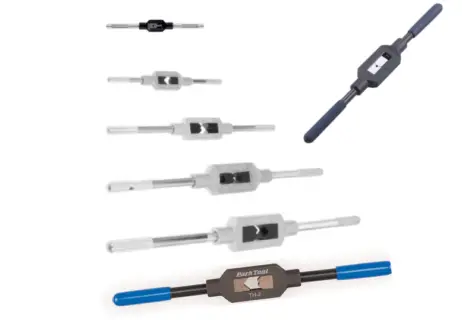
Tap Wrench & Tap Wrench Types
We can’t use our fingers to twist the taps. The tool that lets us hold and twist the tap with our hands is called a “tap wrench.” also known as “handle”.
There are two kinds: tap wrenches that can be adjusted and ones that have a fixed size. A tap wrench that can be changed can be used with taps of different sizes.
Fixed gauge tap rods are usually used in shops that always thread the same size since they can only be used in the tap gauge that they were made for.
In both types, the square-shaped holes in the tap wrench and the part around the tap that holds it must be hardened. If you don’t, the holes will get bigger and make the tap wrench useless.
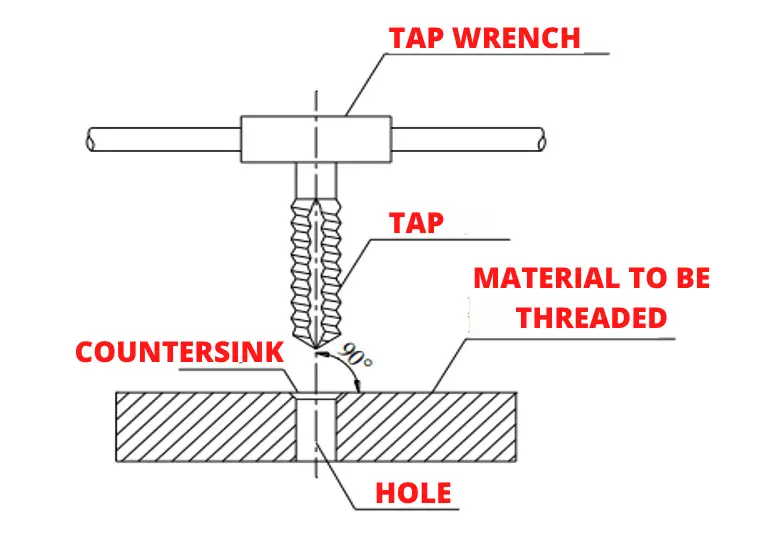
Tapping Technique & Using A Tapping Wrench
After the hole has been drilled in the workpiece, it may be helpful to countersink 90 degrees to the top of the hole so that the tap threads can fit into the workpiece. Without putting too much force on the tap at first, equal and increasing force is applied from both sides of the tap wrench through the tap wrench, perpendicular to the hole axis, so that the tap threads engage the hole. Once the tap is in the hole and held in place, the chip removal process begins by turning the tap in a clockwise direction. By cutting the tap threads, oil is dripped onto the cutter teeth from the guide channels. This makes it easier to get rid of chips. By turning the tap backward every so often, the chips that have built up in the threads of the tap are cut off and can’t get stuck between the channels. When the job is done, the tap is cleaned and put back where it should be.

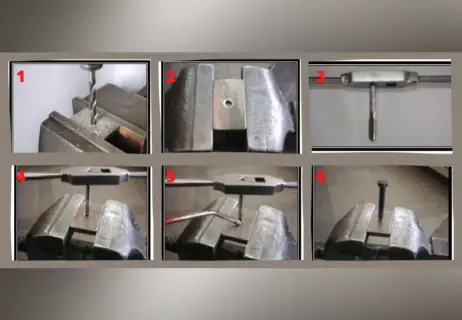
Basic steps of hand tapping.
1) Be sure part is fixed so it will not move during tapping!
2) Tap Wrench, handle size must be in suitable size! Select smaller for small taps and larger handles for large taps.
3) Having a lubricator beside the job for tapping, use it before putting tap in.
4) Drilled hole in correct diameter for the tap size needed. Drill 0.1mm larger hole for easy tapping
5) Tap perpendicular to the task surface using right angle gauges. Often check it in beginning.
6) Turn wrench in reverse direction to break chips and swarf to release stress from tap
7) Remove the tap halfway and blast the chips at the bottom of the hole.
8) Finish tapping the hole until it reaches the bottom.
9) To finalize, take out the tap, blast the chips and oil at the bottom of the hole.
How To Hand Tap A Hole? Detailed explanation.
You need to have a hand tap set that has three series of taps. Often called “serial taps” or “1-2-3 Tap”.
You must wear safety glasses and gloves to protect your eyes and hands from dangerous tap cracking.
See the figures below to understand the process.
Make sure that the tap turns around the hole axis. The tap is put into the hole so that it is perpendicular to the surface of the part.
A few drops of oil you need to put in the hole’s opening to make it easier to get the chip out. Then, while slightly pushing down on the tap wrench at the same time, a clockwise turn is made.
When tapping, lubricating the inside of the hole makes it easier to get the chips out and cut better. The first tap is an important part of the process of tapping.
Make sure the tap is parallel to the work piece’s surface, and use the tap wrench to turn it clockwise by lightly pressing on it.
When you let go of the tap wrench, the sputtering process is done well if the tap stays on the part and doesn’t fall off.
After the tapping, it is turned half a turn clockwise (chip removal) and then a quarter turn in the opposite direction (breaking of the removed chip from the part, breaking it).
It shouldn’t be pushed too hard in this way. Each tap set has three individual taps with different cutting-edge profiles so that these stresses and breaks don’t happen and it’s easier to pull a screw smoothly.
This is done again and again until the hole is done. By turning the wrench around its axis back and forth about once every quarter of a turn, the chips are broken up and new lubricating oil gets to the cutting edges.
Taps 2 and 3 go through the same process again. This is done again and again until the tap can turn and move inside the part with just a little bit of finger pressure.
Your screw needs to be properly fastened to the hand-tapped hole and turned without stacking.
Thread Gauges
Thread gauges are very helpful when you don’t know the screw pitch. Thread gauges are created for checking and measuring the screw pitch of metric or Whitworth screws.
Gauges put on the thread must perfectly sit on the screw`s thread profile, so you can be sure the pitch on the screw is the same as the pitch on the thread gauge.
If the gauge’s threads fit the screw hole best and no light gets through, that gauge is the right one for our screw’s pitch. If our thread gauge is metric, the step is written in millimeters (mm).
If the thread gauge is Whitworth, the pitch is given as the number of threads in an inch(24.5mm) or the nominal diameter of the screw in an inch.

Summary
In final words, the hand-tapping process is very easy and fast. However, it brings some risks, like you can brake a tap by hand tapping easily. So before attending hand tapping make sure you understand the process clearly, and follow health and safety best practices like wearing safety glasses and gloves.
[email_subscription]